Big and furry isn’t always seen as a positive, but when it comes to my brows, it is.
As a massive fan of the soap brow trend and fluffy, feathery face framers, my ears pricked up as soon as I heard about a new treatment: brow lamination.
A quick search of the hashtag on Instagram and my eyes were met with an impressive library of before and after photos. Thin brows, unruly brows, patchy brows and lank brows were transformed to stand to attention, with the hairs restructured and directed to fan out like a lion’s mane. Aka my dream brows realised.
RELATED: These are the treatments we’ll all be getting in 2020
RELATED: This is what Botox actually looks like
The treatment is already taking off in the UK and Europe, but after a quick home soil search, I came across Fay from Royal Clinics Australia. The first and so far only place in Sydney offering brow lamination, I contacted Fay to get the lowdown…
What is brow lamination?
Brow lamination provides similar results to microblading, but with no pain or needling involved.
“It’s a special type of keratin for the eyebrows only”, says Fay. “It helps to stimulate growth and strengthen the eyebrow hairs, creating thick, fluffy and full eyebrows.”
“A lot of people mistake it for a perm, but it’s slightly different. A perm will damage the brow hairs and burn the skin, whereas lamination won’t.”
Lamination is often paired with a shaping and brow tint to maximise the results.
My brows before lamination
My natural brows are quite full, but they just never hold shape, no matter what products I use. They tend to droop downwards, especially in the arch area where I’ll always have one or two strays just hanging low.
I had mircoblading about 3-4 years ago, but the pigment has since faded and I never bothered getting a top up. I think because fullness wasn’t the real problem, but more so the way my brow hairs sat. Also, microblading is expensive!
Upon meeting with Fay she told me my brows were ideal for lamination. Although to be fair, she also said the treament suits everyone. “But anyone with particularly curly or unruly brows (or hairs that grow in random different directions) will benefit most.”
I hadn’t waxed, trimmed or touched my brows in weeks, which is something Fay strongly recommends pre-appointment. Thanks to my laziness, we were good to go.
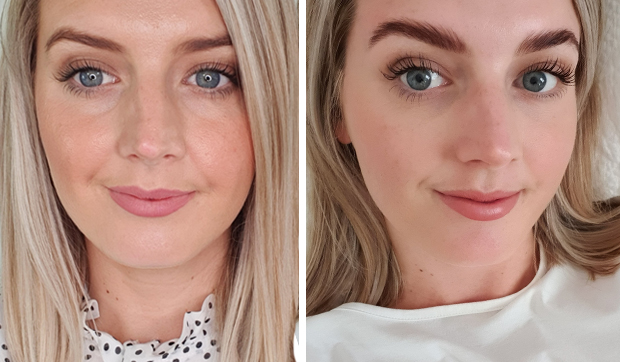
(Left: brows before Right: brows straight after lamination)
During the treatment
The best part about brow lamination? You just get to sit there and relax.
First, Fay cleansed my brows, making sure they were free from product and the surrounding area was clean. Then she took to them with a small, plastic-like comb to “comb and shape the hairs in the right direction”. Quite a bit of pressure is used to coax the hairs, which can feel a little scratchy but doesn’t hurt (it’s also the only thing you’ll feel for the entire treatment).
“Once combed, the keratin is slathered on the brow and set with cling wrap”, says Fay. The keratin solution felt just like a cream being applied and was quite cooling on the skin. It has a noticeable but not overpowering smell, which reminded me slightly of hair removal cream (don’t worry though, my hairs are still very much intact!).
Once the cling wrap was on, the keratin was left on for about 10 minutes (time can vary depending on your brow texture), during which I felt no pain, not even a hint of a tingling sensation. Most comfortable treatment ever.
Once the time was up, Fay removed the cling wrap and then the keratin treatment, wiping my brows clean and taking to them with a spoolie. She frequently brushed my brows up throughout the entire process to ensure they were sitting correctly.
Next, “a nourishing setting serum is applied over the brow”, and secured with cling wrap. This cream felt more like a hair mask for the brows; it was thick in texture, soothing on the skin and smelt pleasant. It was left on for a little longer than the keratin, more around the 15 to 20 minute mark.
(Left: brows before Right: brows straight after lamination)
Once the nourishing cream was removed, it was then time to tint and shape my brows. I like my brows quite dark, so we went for a medium brown shade.
Fay has a very unique way of tinting, too. She applies majority of the colour to the base of the brows, in order to keep the ends nice and fluffy looking. She’ll then remove the tint from the start of the brow first, leaving the tails for a little longer to create an ombré effect. While tinting mine, she also explained that she leaves the tint on a little longer after lamination as it can take longer to penetrate the hairs post-keratin.
The tint was then followed with a wax; first the monobrow, then the undersides and the tops too for good measure.
And then, after about an hour from when we began, it was finally time for me to see my new brows.
My brows immediately after the lamination
Straight after the treament, the brows have a wet-look about them .
I immediately loved how much bigger and feathery they looked, but also thought I looked a bit nutty, as though I’d gone at my brows with a glue stick. I was under strict instructions from Fay not to touch them for 24 hours, so while I can’t comment on what they felt like to touch, I’d imagine they were slightly stiff.
For the next day I also had to avoid hot steamy showers, getting my brows wet or sweating. As you can imagine, I was devastated to discover this meant going home to watch Love Island rather than hitting the gym.
Final verdict
After passing my 24 hour ban, I jumped in the shower, turned that temperature right up and gave my face a thorough cleanse.
Once out, I looked straight in the mirror and.. was disappointed as my brows looked the same, only flat and dark.
BUT THEN. I remembered that Fay had told me that I would need to brush them into place using a clean spoolie or comb. No product, just anything to brush them up.
And holy mother of sh*t. When I brushed them up, they stayed up. They fanned out beautifully. Kinks were non-existent, they were feathery, they were light, natural and fluffy looking. They were my DREAM BROWS.
(Left: brows before lamination Right: brows two days after lamination)
In the five days that have followed since that moment, I still can’t believe all I have to do is brush a spoolie through to get this effect. It’s like soap brows, only better, because without any product in them they look so natural. Of course, I can add product if I want to and will probably do so as the tint fades.
According to Fay, the lamination will last for up to two months. The treatment cost $95 (for lamination and shaping) + $15 (for tint). Considering how happy I am with the results, I think the price (and top-up frequency) is reasonable enough to add into my regular routine. I don’t get lash lifts, so consider that my justification for a regular ‘brow lift’.
Would you try this treatment?


I’ve been wondering what this brow lamination is all about. I’m too much of a scaredy cat to get this done. Kinda cool idea though
Fantastic!!! As I am ageing my brows are becoming spare (not that I’ve had a lot). Normally I use brow fibre
Love how natural they look and good value too
personally I don’t like the way the eyebrows look all brushed up it reminds me of the grinch to be honest but you do you I guess
sounds less painful than microblading.. and cheaper too !
I have been really obsessed over how my eyebrows look lately and might have to get something done but probably not lamination because I am not a huge fan of the bushy look, but it looks really nice on her!
Holy Moley! Her eyebrows look great!! I don’t know any local beauty therapists that offer this service.
I’d love to get this done.
They are more pronounced now.
looks good on her! not sure id give it a go?? mine are sooo fine and fair
I personally don’t like the brushed up brow look. I think it looks messy.
Some people say that love spell doesn’t work but I have seen that love spell works all because of Dr John Soco the best spell caster is from Turkey Who cast a spell for me and brought back my wife back to me and we are living as one family all thanks to Dr John soco . You can contact him on WhatsApp +1 706 871 4571 ..
Very nice look.
Hello everyone, my name is Dawn from California. I am here to share this great testimony for a great work Dr Marabul have done for my family. I’m so happy that my broken Marriage has been restored. “We recently made up, even though it was difficult. It’s been more than three month now, everything change for the better the moment i came across Dr Marabul. My husband has began to treat me better more than before. The nightmare that had lasted for almost 2 years before we broke up is finally over. It’s like we fall in love all over again! We’ve both put the past behind us, and are trying to move forward – and for the first time in a long time, the future looks a lot brighter. I can’t express in words how grateful I am ever since Dr Marabul bring my home back together again! It’s like we’ve finally rediscovered those things about each other that made us fall in love in the first place. All of the worrying and stress has simply vanished. Thank you Dr Marabul for saving my broken Marriage and brought my husband back to me!”. Me and my husband are living together happily again.. Dr Marabul is really a gifted man and i will not stop publishing him because he is a wonderful man… If you have any problem and you are looking for a real and genuine spell caster to solve all your problems for you. (1) INSTANT MONEY
(2)WORK OF LEADERSHIP
(3)MONEY RITUALS
(4) BUSINESS TO MOVE FORWARD
(5) LOTTO NUMBER
(6) PROMOTION IN WORKING PLACE
(7) MARRIAGE PROBLEM
(8) COURT CASE
(9) TRAVELING ABROAD
(10) PROTECTION POWER
(11) CHURCH POPULATION
(12) MAGIC TOUCH
(13) IF YOU WANT YOUR EX BACK
(14) CLIENT PROBLEM
(15) FOOTBALL SOLUTIONS
(16) LUCKY OF CHILD
(17) WHEN YOU WANT POWER
(18) FAMILY PROBLEM
(19) POLICE STATION CASE
(20) DOCUMENT PROBLEM.
Try him anytime, he might be the answer to your problems. Here is his
Email marabulspellcaster@gmail.com or whatsapp +2207835430
WOW never heard of this procedure but have to say the end result is impressive. Will watch these posts to see how people react to it. Thanks Beautyheaven.
The results look great, but I baulk at the price – my fringe mostly covers my fringe.
I wouldn’t mind trying a DIY kit at home.
Really would like to try this